Showing posts with label pastry. Show all posts

Thursday, 2 November 2017

Five Quick Desserts

I hate to post so late during the week, but I like to think that there are some out there who would love to get stuck into some great desserts over the weekend. Enjoy!

If you need some quick desserts that will get you out of trouble when you have little time and people arriving on your doorstep?

My husband loves his desserts, but to be honest I don't have time to be making them every day, and my waistline doesn't need to have anything extra added to it. When there is dessert on offer - I eat it, and because of that I need to try and stick to something reasonably healthy, or just eat fruit, except on special occasions.

I've been stealing playing with recipes from friends and family, internet, my old recipe file and just about everywhere to come up with a few quickies.  These have seen me through a few desperate days when I needed something fast, yet good enough to serve to friends and family.

Luckily, I have a lot of rhubarb in the garden, and it is growing like crazy at this time of year.  Here are a few of my favs, with links to the websites where applicable. I have made all of them as the photos will show, and they are all fast to make and pretty darn healthy. Well, I am stretching that a little......


Roasted Rhubarb- serves 4 

a quantity of rhubarb stalks washed and chopped into large pieces
1/4 cup honey
1 teaspoon ground cinnamon
2 star anise
zest of 1 orange
1/2 cup orange juice

Chop up the Rhubarb into small lengths and place it in an oven tray. Mix together the rest of the ingredients and spread this over the rhubarb. Bake in a moderate oven 160º fan forced/180º/350º until soft, around 30 minutes. Remove star anise and serve with custard, ice cream or cream.

Alternatively, you can make this into a Rhubarb Fool. 
Whip a carton  of cream, 300mls until thick and slowly incorporate the rhubarb. Keep some of the juice aside. Now fill up some sundae dishes, glasses or whatever is at hand, dripping the juice over the top. Add a sprig of mint to finish this off. Serve by itself.


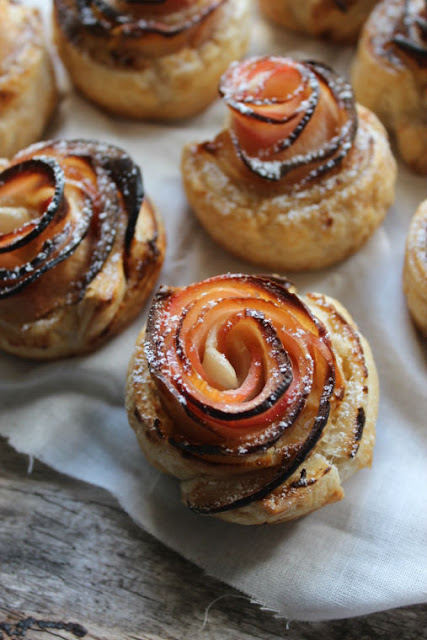
Apple - Pastry Roses

I was really impressed with the way these 'Apple Roses' looked - so pretty. This was very fast to make and I only cooked them for 30 minutes.  The only problem I found with the recipe was that after cooking the cream cheese just seemed to disappear. I have replaced cream cheese with Mascarpone and mixed in lemon zest. I found this worked much better. Also cook the apples until they are really soft so they are easier to roll.

You will find the recipe here:  
https://www.pinterest.com.au/pin/74239093841437331/


Raw Chocolate Mousse - 4 serves

2 ripe avocadoes
1/2 cup carob powder
1/3 cup honey
1/4 cup coconut milk
pinch salt

Put all of the ingredients into a food processor and blend together. Empty into a container and place in the fridge for 1 hr. Serve with fresh fruit or by itself. Just increase the quantities if you need to make for more people.


Banana and Raspberry Ice Cream - 4 serves

2 large frozen bananas, peeled
1 cup frozen raspberries/strawberries


Place the bananas and the raspberries in a food processor and pulse until it turns into ice cream. You may need to stop the machine a few times and scrape down the sides. Use immediately or store in the freezer in a sealed container. But remember to take out of the freezer for a good 10 minutes before serving, to allow it to soften. 

Its worth keeping some frozen bananas in the freezer at all times. They are great for smoothies too.  Don't forget to peel and slice them before freezing.Because it's damned hard and messy trying to peel them after they are frozen - believe me I have tried. This is fabulous on a hot day and really as good as any home made ice cream.



Thursday, 5 October 2017

Leek, Zucchini and Cheddar Cheese Hand Pies


The last time I made these Leek, Zucchini and Cheddar Cheese Hand Pies, I had a picnic in mind. Preparing to travel from Adelaide to Melbourne via the Overland train, my thoughts as usual were on food. Train food I'd heard, was pretty average which  meant I really needed to pack my own.  I anticipated a glorious picnic on the train and wanted something special to eat.

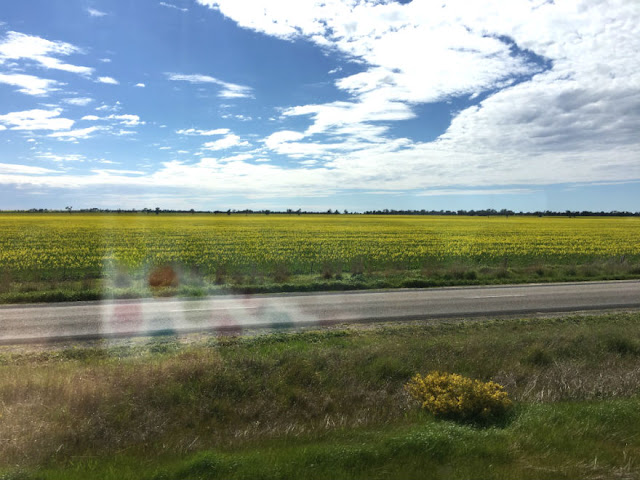
What an interesting way to experience the countryside from the Adelaide plains, through the hills to the River Murray and out into the rural and farming areas of South Australia and Victoria.

The day started well, cool morning but no rain and the train gathered speed after the hilly bits as we were heading across country at over 100 kms an hour. Compare it to the Bullet Train in Japan and that is a walking pace but it was lovely to see the River Murray from this vantage point as it curls its way down to the sea.


The sun was shining, I was reading "Girl on the Train' by Paula Hawkins and I settled down to the comfort of the Overland. We passed huge wheat silos, kangaroos and emus, sheep and baby lambs. We glimpsed the runners of the Stawell Gift, Australia's richest foot race and saw other animals and farming implements. It was a truly relaxing time.

And resting in my lunch bag was a box full of these hand pies. Cold of course. But when I opened the lid and the smell wafted out into the train all eyes were suddenly on me. Other passengers noses were in the air, they could smell the aroma coming from my lunch box and they were salivating.

Unfortunately, I didn't have enough to hand around and i felt quite guilty eating them myself because they truly were delicious.

And to avoid the same situation recurring, I've shared my recipe.


LEEK, ZUCCHINI AND CHEDDAR CHEESE HAND PIES


To make 10 - 12 pies you will need;


  • Filling
  • 1 large leek, cleaned and finely chopped
  • 1 zucchini, finely chopped
  • 1.5 - 2 cups of cheddar cheese, finely chopped or grated
  • 1 teaspoon of fresh thyme, finely chopped
  • 1 teaspoon oregano/marjoram, finely chopped
  • 1 egg beaten
  • 2 tablespoons plain yoghurt
  • 1 tablespoon olive oil
  • small nob of butter
  • 1 tablespoon flour
  • salt and pepper

Pastry

I used bought sheets of Pampas Butter Puff Pastry.


This is how you make them:-

I used a medium sized fry pan, added the oil and butter and gently cooked the zucchini, leek and herbs until they were slightly browned.

In a small bowl I added yoghurt and an egg and gave it a quick beat together. I added salt and pepper, flour and cheese and stirred until it was combined.

Once the leek and zucchini are cooked, let them cool a little, then add them to the yoghurt and egg mixture. Now cover and place in the fridge until completely cold. You can do this the day before if it is easier.

Pastry

Find something round you can used as a template for making circles. I used a mixing bowl that was  5 inches/13 cms in diameter and scored around it with a knife.  My pastry came in sheets and I managed to get 2 circles out of each sheet.


Place a large tablespoon of the mixture in the centre of the pastry circle, wet the edges of the pastry using water and a pastry bush. Now fold the pastry in half and seal the edges with your fingers. With the tip of a sharp knife, cut a small v in the top of the pastry to allow steam to escape.

Repeat with the remaining pastry and filling.


Put the pies on a baking tray lined with baking paper and bake at 200ºC/400ºF/6 for 15 - 20 minutes. Eat them piping hot or cool and refrigerate or freeze for later.


Wednesday, 21 June 2017

Best Ever Apple Pie


Sadly, I don't have memories of the smell of apple pie coming from my grand mother's kitchen. I have very little memory of my paternal grandmother. I know she had a blue budgerigar in a cage because I remember it biting my finger. Unfortunately my grandmother did not have good health and became blind in her eighties.   

But I do have great memories of my next door neighbour's fantastic apple trees.

My sister and I weren't allowed to hop over the fence and pinch the apples because the neighbours had a mad dog called Bryn. We were terrified of that dog and would never venture into their garden. 

But when our neighbour kindly gave us a few of the fallen apples, I knew it was time for mum to make an apple pie. And I watched as she made the pastry, peeled the apples, added sugar and turned that mountain of lush fruit into the most amazing dessert.


As a kid you don't really care if the pastry is bit rustic, in fact the more rustic the more mouth watering you know it will be and once that golden pastry was lifted from the oven, you couldn't wait until dinner time when you knew you would get a slice of that perfect pie, topped with ice cream or cream.

My favourite dessert as a kid was apple pie and rice pudding - oh that beautiful, slightly burnt, brown skin on the top of the rice and a hint of nutmeg and butter. 

Rhubarb and apple figured highly because dad grew heaps of rhubarb, so often Sunday roast was followed by rhubarb and custard. What was your favourite dessert?


There are so many delicious recipes on the web for rhubarb; spiced, roasted, devilled, tarts and I think you will find a couple on my blog, so there's plenty to choose from.


I don't make pies that often, but when I look over at the bowl of Granny Smith apples that I have just bought, I know it's time to recreate a little magic in my kitchen. Just like my mum did. 


APPLE PIE

Ingredients

700g prepared Granny Smith apples
250g plain flour
125g unsalted butter
1 teaspoon icing sugar
2 tablespoons iced water
1 cinnamon stick
pinch of cloves
2 tablespoons water
zest of a lemon
1 tablespoon milk

Prepare a pie plate by rubbing with melted butter, then place in fridge until ready to use.

Make the pastry by sifting flour, icing sugar and then rubbing the butter into the flour, either by hand or food processor. I prefer to do it by hand. Add enough water to bring it all together in a soft dough. Now cover in plastic and let rest in the fridge for 30 minutes.

While the pastry is resting peel, core and chop apples, add to a saucepan with a little water, lemon zest, cinnamon stick and a pinch of cloves. Cook for around 10 minutes until they are slightly softened. No need to add any sugar. Remove from the pan and cool. 

While the apple is cooling , take pastry from fridge, divide in half and roll out to fit your prepared pie plate. Line your pie plate with one half of the pastry and add the apples, removing the cinnamon stick first.

Pile the apples in so you have a nice high pie. Wet the rim of the pastry edge with milk, ready to stick the top down.

Add the pastry lid and seal the edges by pressing them together. Cut off excess pastry. Brush the top of the pie with milk, making a couple of tiny cuts in the top of the pastry for the steam to escape.

Place in a pre heated moderate oven 180º/350F for around 25 minutes, until the pastry is golden brown.

Serve with cream, ice cream or just by itself.


Wednesday, 14 June 2017

Bakewell Tart Slice


Sugar free is fine most of the time but occasionally I get the urge to have something sweet. I try fruit but it just doesn't do it, know what I mean?

Family members are getting restless, they haven't seen me rummaging in the cupboard for a cake tin and they keep checking the pantry to see if anything has been hidden.

I got the message! I thought a nice little slice sounded perfect. A Bakewell tart usually consists of a pastry base, lots of raspberry jam and a frangipane topping.


 I used a jar of Beerenberg Raspberry and Violet Jam, a gift from a friend and it is perfect for the jam layer. The violet just provides something a little more fragrant and a lovely vibrant colour. Technically you could use any jam you like but hey, I'm going with tradition today.


The sun is out and I've served these, fresh from the oven, on the deck in the sun! What a great way to enjoy a public holiday.


Bakewell Tart is traditionally English and as Southern Australia celebrates Queen Elizabeth's birthday this week, (actually it's pretty crazy because it isn't really her birthday) it is a rather fitting recipe to mark this occasion.


BAKEWELL TART SLICE

You will need a slice tray approximately 30 x 23cm or 12 x 9 in, lined with baking paper.

For the pastry layer
170g plain flour
75g butter, softened
100g caster sugar
iced water


For the frangipane layer
2 eggs
1 teaspoon baking powder
175 g self raising flour
100g caster sugar
1/2 cup almond meal

1/2 - 1 cup of raspberry jam
1 handful of flaked almonds


To make the pastry, combine sugar, softened butter and plain flour in a food processor. Add iced water, approx 1 - 2 tablespoons mixing to make a soft dough.
Press the dough into the bottom of the lined tray and bake in a moderate oven 180º/ 160 fan forced,  for 15 - 20 minutes until lightly golden. Remove from the oven and cool slightly.

In a large bowl beat eggs and caster sugar until light and fluffy. Fold in flour, baking powder, almond meal, mixing to a medium batter.

On top of the pastry, spread the jam - be generous.

Now top with the frangipane mixture.

Sprinkle the top with flaked almonds and bake for a further 20 - 25 minutes until golden brown.

Remove from the oven and cool in the tin.

Once cool, cut into slices and serve. This is lovely served with cream or custard. Yum!


Tuesday, 16 February 2016

How To Avoid a Soggy (Pastry) Bottom

Now stop laughing because for many people  a soggy bottom is a real problem!

Only a few days ago a friend cooked a Tomato Tart using puff pastry but she was unable to get the bottom of the tart to cook. She asked my opinion on what she did wrong and how to avoid a soggy bottom with puff pastry.

Remembering back to my first few quiches, I suffered from a similar problem, although I used a shortcrust pastry. Then I learned about blind baking.


BLIND BAKING PASTRY CASES

Blind baking isn't turning the oven on wearing a blind fold.


It is where you bake a pastry case for a short period of time  of the without a filling, to ensure the bottom of the pastry is cooked through.

To stop pastry on the base rising, it is necessary to prick the pastry base with a fork, cover it with baking or greaseproof paper and fill the cavity with dried beans or Ceramic Pie Weights. The shell is then cooked for a short time without the filling.


This method allows the pastry to cook right through to the bottom layer once the filling is added.

Ok we have learned that the hard way. But does this method work with puff pastry????

PUFF PASTRY

No matter whose recipe you read, there are arguments for and against blind baking puff pastry! In fact many chefs will not use puff pastry on the bottom of a filled pie because there is no guarantee that it will cook through.

As a rule, I blind bake all pastry cases; puff, flaky, shortcrust. The only exception is if I making very small puff pastry finger foods, where the filling is completely wrapped in puff pastry - then I bake it on a high temperature to ensure it's sealed and cooked quickly.

WHAT THE EXPERTS SAY

I called into my local bakery 'Banana Bogie' at Belair and spoke with baker Jason Spencer. I asked his opinion on puff pastry.  


One of the most important things to remember when using puff pastry, according to Jason is to make sure you cook pastry at the correct temperature; puff pastry needs to bake quickly at a high temperature, around 200º or higher depending on your oven. Also, you need to ensure that your filling isn't too wet, because this can also make for a soggy bottom.

Jason stated that most commercial bakers/bakeries would use two kinds of pastry to make pies; puff pastry for the top of the pie because it puffs up beautifully, gives a wonderful golden colour to the pie and is nice and flaky when you eat it. The other end of the pie is usually a shortcrust pastry, which holds the filling in and cooks right through to the base - so no soggy bottoms. How sneaky is this???

I have the recipe for the Tomato Tart that my friend made. I decided to give it a go with puff pastry too, but I did blind bake the pastry cases. I decided to make individual tarts, because that was more useful at the time.


(I've not included the recipe, because I don't have permission to re print it.) But, guess what? No soggy bottoms!

Now you might just disagree with blind baking your pastry and that is Ok. Whatever works for you is fine. But after a few years of failures, this works for me every time.

The recipe came from a book called "Delia's Happy Christmas' Cookbook. You may be able to search for it on line. Delia Smith did not recommend blind baking the pastry for this recipe.


Tuesday, 24 March 2015

Pizza or Pissaladière?

I am sitting, quietly thinking, enjoying the last weeks of warm weather. As the trees turn their autumn colours, leaves slowly drifting off their branches and hurried along by wind gusts, its hard to imagine that summer is over so soon. I will welcome the winter this year because we have had so little rain. Gardens are dying and animals have no feed in their paddocks. Cattle and sheep are being fed on hay, a big expense for farmers, but what is the alternative?

It has been dry enough to send brown snakes up to the house and Blue Tongue lizards out from their shrubbery: koalas drinking water from containers put out by caring neighbours, it is the driest period in 38 years.

Early mornings have the autumn air and soon there will be heaters and sweaters and wooly hats and thick soups to take the chill off any outdoor pursuits. But until then lets enjoy what mother nature provides, the warmth of the sun and the colours of a rainbow.


I've just been looking at photographs taken a couple of years ago in France and the gardens are so beautiful and the countryside is so green; I 'm reminded of Brie and French Onion Soup and truffles, so tonight I am going to settle on a French dish!

Do you know the difference between a Pizza and a Pissaladière? If you are not sure then here is a simple explanation. Pissaladière is the French equivalent of an Italian pizza without cheese.

If you drop in to any bakery in the Provence region of France, you are sure to find a version of this. A Pissaladière is full of creamy onions, anchovies and olives. While it is a simple dish the onions must be slowly cooked in butter so they do not brown but become deliciously soft and buttery and melt in the mouth.


Here's a recipe for you to try, loosely based on a recipe of Marie Claire.


While I was hunting around at French Language Courses, I stumbled upon this blog.
http://www.frenchmoments.eu/category/blog.

There are some beautiful photographs of France and especially Paris. It is worth taking a look and I am excited to think that I will be visiting Paris later in the year. 


Pissaladière

DOUGH

2 cups plain flour - I use 00 flour
1 teaspoon  dried yeast
3/4 cup warm water
pinch sugar
1/4 cup olive oil

FILLING

1 kilo brown onions finely sliced
125 grams butter
anchovies
black olives
fresh thyme
salt and pepper

Starting with the dough - place the flour, sugar, yeast into a bowl. Add oil to the water and mix then add to the dry ingredients. Bring the dough together. Knead for a few minutes until the dough becomes soft and smooth. Cover and leave in a warm place until it doubles in size.


To make the filling. Slice the onions finely. Add butter to a frypan and add the onions and fresh thyme. Cook on a very low heat for around 1 - 1.5 hours until the onions are transparent and very very soft. Do not allow them to brown. Season with salt and pepper and set aside to cool.


Once the pastry has risen, roll out to a rectangle on to some parchment paper about 40 cm x 30 cms . Place on a baking tray. Brush the pastry with a little olive oil and add all of the onions spreading over the entire surface. Next add the anchovies, which have been cut in half lengthways, in a cross pattern. (see picture) Add black olives. Set aside and allow to stand for another 20 - 30 minutes.


Heat oven to 220º degrees C/200 fan forced and cook the Pissaaladiere for 15 - 20 minutes, until the dough is crisp and brown and the onions have some colour. Turn onto a cutting board and cut into pieces. Enjoy with a green salad and a glass of red wine.

Monday, 10 November 2014

Pear and Chocolate Tart

Some enormous pears appeared in my Aussie Farmer's fruit box last week and I could think of nothing better than to make this delicious tart.

Pears are so versatile. Often used in savoury as well as sweet dishes, available all year round and very nutritious.  Pears are very high in fibre and half of the pear's total dietary fibre as well as its antioxidant and anti inflammatory phytonutrients are found in the skin, so it's best not to peel them. Because they contain less acid than apples, dentists seem to prefer you to eat these because they do less damage to your teeth.

You can find pear varieties in many colours from green through to red, gold and brown and each variety has its own properties and qualities.

Pears are another member of the rose family and lets face it aren't roses good for just about any occasion!

It was very coincidental that I had just bought a book called 'Australian Pears', which contains delicious recipes from some of Australia's finest chefs.

I decided to try  Guy Grossi's Chocolate and Pear Tart because I really wanted a show stopper and I felt the need to compliment my beautiful pears. However, I did change the recipe ever so slightly and I would now possibly cut down on some of the cocoa in the pastry just a little, to better fit with my palette. 


This is how I interpreted the recipe and the changes I made. It was delicious! I will certainly be trying more pear recipes from this book and I have my eye on an Upside Down Pear Pudding. I will let you know how it goes.


 Guy Grossi's Chocolate and Pear Tart

Pastry

100g butter
200g flour
60g cocoa (I would use 40g next time)
2 eggs (I actually only used 1 very large egg)
100g caster sugar

Place flour and butter into a bowl and rub in to resemble breadcrumbs. Sift in the cocoa powder and add sugar.
Lightly beat egg and add enough to bind the dry ingredients together. Turn onto bench and knead very slightly. Cover and chill for 20 minutes.

Filling

4 pears (I used Packham's)
200g dark chocolate 70%
100g butter
4 eggs separated (I used 3 large)
200g caster sugar (I changed it to 150g)
2 tablespoons of marmalade (This was omitted from the original recipe)

Take a deep flan ring 28cm and grease it. Roll out the pastry to 5mm thickness and line the flan ring by pressing into the flutes. If it starts to break a little, don't worry, just press it together and ease it into the ring. Brush the pastry with marmalade. I used a slightly bitter orange marmalade. Once cooked the marmalade tasted as though I had added a liqueur.

Cut the pears into quarters and remove the cores. (I had to peel mine this time, but you can leave the skin on if you prefer) Arrange on the base of the flan.


Pre-heat oven to 180º.

Melt chocolate and butter together over a low heat. Set aside to cool slightly. Beat egg yolks and sugar until pale and fluffy. Fold in cooled chocolate mixture. Whisk egg whites until stiff and fold into the mixture. Pour this over the pears and bake for approximately 40 minutes until nice and crispy.


Monday, 22 September 2014

Mushroom Pies

Looking into the fridge the other day, contemplating what to cook for dinner. Mushrooms! I had 4 large brown, gorgeous looking mushrooms which caught my eye.  One of my all time favourite summer mushroom recipes is a sort of mushroom Streudel made with phyllo pastry, but because it involves sour cream I don't cook it too often. I am still wanting to throw off a few kilos, so I am trying to be a bit careful.
I did a search in the fridge to see what else was lurking there that needed to be used immediately and what I came up with lead me to this -  Mushroom Pies. Mushrooms are great for vegetarians because they contain essential vitamins and minerals and are a good source of protein; And are low calorie,

I use mushrooms almost every week. If they are not being chopped into a salad, then I am adding them to eggs for omelette, into casseroles, blended to make dips and on their own, lightly cooked with lots of black pepper.


Incidentally over the past week I have been reading about raw foods. I was interested in seeing how a mix of water and cashew nuts blended together would make a creamy sauce; one that could be added to any casserole or stew to give it a nice creamy consistency. Time to add this to my mushrooms to make a pie filling. I also had a little bought puff pastry that I was desperate to use up and this helped enormously as I was in a screaming hurry to get some food on the table.

I used a combination of the beautiful large brown mushrooms, and a mixture of things I had in the fridge; you can use whatever you have but this combination worked really well. You could add cooked broccoli, frozen or fresh peas, finely chopped carrot etc etc.

This is what I made and it was pretty delicious. I made enough for 4 servings, but it would be easy to add extra ingredients or less, depending on how many people you want to serve. My little pie tins took 1 whole sheet of puff pastry each. Depending on the size of yours, you will have to calculate how many you need.


Little Mushroom Pies (with whatever)


Ingredients

5 large brown mushrooms chopped
1 brown onion finely chopped
1 stick of celery finely chopped
1/2 a leek finely slice
2 cloves garlic minced
1 cup raw cashew nuts
1/2 cup water
1 tbls olive oil
salt and pepper
fresh thyme and parsley chopped finely
4 sheets of ready made puff pastry (I used Pampas)
a little butter for greasing the pie dishes
a little water for the pastry edges
  • Take pastry out of the freezer and defrost ready for making pies.
  • Place the cashew nuts and water into a blender or if you are using a hand held stick, into a bowl and blitz until smooth and creamy. Set aside.
  • Add 1 tablespoon of olive oil to a frying pan and cook onions until soft, add garlic and cook for a further 2 minutes.
  • Add leek, celery, salt and pepper and cook for a further 3 minutes. Turn the heat up a little and add chopped mushrooms and cook for 6 minutes.
  • Cut out your pastry for a top and a bottom to suit your pie tins. Grease pie dishes while you are waiting.
  • Add the creamed cashew and water mixture and stir until all is coated. Adjust seasoning and add chopped parsley and thyme and stir in well. Turn off the heat and allow the mixture to cool.
  • Heat oven to 200ºc Fan forced.
  • Line pie tins with pastry, add filling. Using a pastry brush, brush the edges of the pastry with water and add the pastry tops, pressing down along the edge to seal or pinch them to make a scalloped pattern. When all pies are completed, take a sharp knife and add a small v shape in the middle of the pastry to allow steam to escape.
  • Place in the oven and cook for 20 -25 minutes, until pastry is nicely brown and has risen well.
Serving 4 people: estimated cost $8, that is $2 per head, add more if you serve with extra vegetables or salad.


Sunday, 22 December 2013

What a load of Rhubarb!

The Chinese had it first, Marco Polo talked extensively about it and the Greeks had some extrodinary names for it, but we call it just plain, Rhubarb.

When I was just a kid in England, I remember my father used to have a huge bed of rhubarb. He would carefully collect any horse manure from the neighbouring yards and he would dig it in to the rhubarb bed. He had an old metal bucket that had a hole in the bottom which carried ashes from the fire until the bottom burned out. Each winter he would pick his best rhubarb crown and carefully lay the bucket over the top. My sister and I would keep a watch on the rhubarb over winter, brushing off the snow if it became buried by an overnight flurry. We watched it to make sure that we would be able to break off a few pieces when Dad wasn't watching, sneak into the kitchen and dip the end of the rhubarb into the sugar bowl and eat the crisp, juicy but sour rhubarb. We all loved it.


By Spring, Dad's prize rhubarb would be growing out of the top of the bucket and we knew that mum would soon be making crumbles and pies for Sunday lunch.

I picked a big bunch of rhubarb from my vegetable garden yesterday and thought it was time to make something delicious. I checked my fridge to see what I could possibly teem up with Rhubarb and decided that some Creme Patisserie would be a wonderful combination.

Here is a recipe for a French Rhubarb Tart - When you eat it, think of your parents and what they did to make your memories so wonderful.


French Rhubarb Tart


A rich sweet pastry, creme patisserie filling, topped with cooked rhubarb and a syrup glaze. The recipe came courtesy of BBC Good Food but adapted to suit. You could substitute this pastry for an ordinary shortcrust pastry with a bit of icing sugar in it.


Ingredients

Rhubarb - 12 x 35 Fluted Flan Dish

500g Rhubarb approx
50g  Caster sugar
Juice of an orange
1/2 Cup Water
Vanilla pod seeds removed and kept

Cut the Rhubarb so it is exactly the width of your flan dish
In a fry pan add water, sugar,orange juice and vanilla pod and cook on a low heat until the sugar has melted.
Add the rhubarb and cook for 5 minutes.
Take off the heat and let the rhubarb cool in the juice, it needs to be cooked but keep its shape. 


Pastry - Oven fan forced 170 degrees 
220g Plain flour
140g Butter
25g almond meal
2 tbls icing sugar
1 egg yolk

Add flour, butter, almond meal and sugar into a food processor and blitz until it resembles breadcrumbs, add egg and 1 - 2 tablespoons of water while still running. Blitz again until it forms a soft dough. Knead very lightly to bring together, wrap in plastic, fridge 30 minutes. Roll out and blind bake with paper and beans in flan dish for 15 minutes, remove beans and paper and bake another 5 minutes. Remove and cool.

Creme Patisserie

4 Egg Yolks
250 ml Milk
100 ml Thickened Cream
2 tbls caster sugar
1 tbls cornflour
1 tbls plain flour

While pastry is resting heat milk and seeds from vanilla pod until it reaches about 90 degrees or just below boiling. Beat egg yolks, flours and sugar together in bowl until pale.  Add warm milk. Strain and put back on heat stirring continuously until the custard thickens. Cool. Whip cream to peaks and add slowly to the custard once the custard is cool enough.

Assemble by spreading the creme patisserie on the base of the flan. Lay the rhubarb onto the creme. Make a syrup by fast boiling the rhubarb juice and once it is cool glaze the rhubarb.

Apart from the resting and cooling time, this really is pretty quick to make and it is delicious.