Thursday 24 April 2014

Seed Sprouting

Do you sprout your own seeds? I have sprouted in the past, but I am trying again because I love fresh bean sprouts. I am also reading about and hope to experiment with Microgreens. Again, because I like the idea of having the freshness on my window sill. Do you have any tips on growing these? Please let me know.

Today, I bought a cheap little seed sprouter from Virginia Nursery in Adelaide. It is a Mr Fothergill's Kitchen Seed Sprouter and I am going to show you how easy it is to sprout seeds and use them.

I have taken the sprouter out of the box and I have washed it thoroughly in soapy water and made sure it is completely dry. I have chosen the Hot and Spicy Mix seeds which consist of Radish and Radish Red Arrow, Kale Red Russian and Broccoli, high in Vitamin B and C.


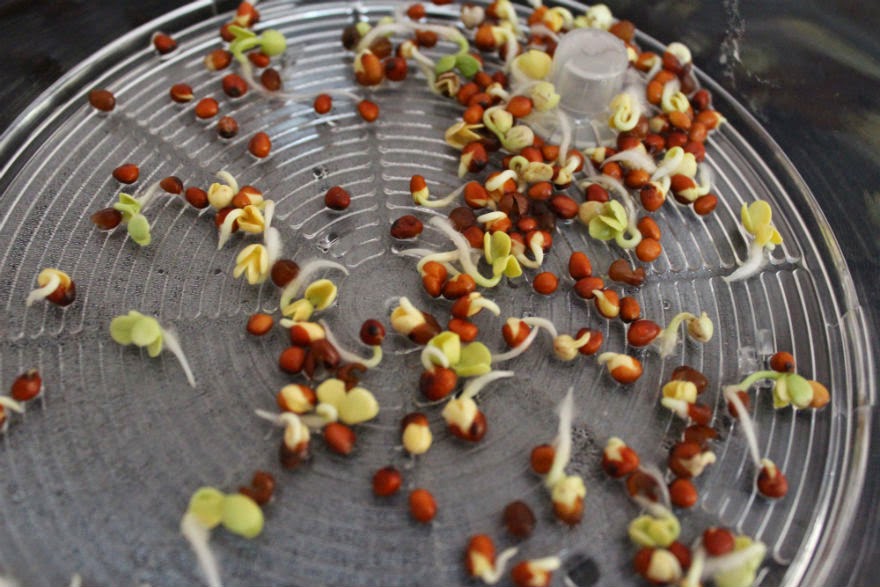
I have only used a few of the seeds to start with because I wanted to see how long they took to sprout and what the ratio was of sprouted to non sprouted seeds. I wasn't entirely sure whether I would like them all anyway. Here are a selection of sprouted seed photos which will show you how quickly they became edible. On day 1 they really didn't do anything, but I continued to wash/water them 3 times a day.

Day 2. The seeds are just beginning to open. I can see the creamy shoots growing.


Day 4. Today I think I could have eaten the Radish sprouts. They have lovely fluffy looking shoots on them. The others seeds have started to sprout but as you can see from the photos the black seeds (Kale) have only just started to open.


Day 6. I almost ate these sprouts with a salad today, but decided to give them one more day. There is just enough for two people to have a scattering. I will definitely be putting in another lot but twice as many this time. The spouts are quite hot and will make a nice additional flavour to my salad. I have just got to wait for the others to open fully so I can taste them and see how they are.


Day 7

Finally they have all opened. What an explosion of sprouts and don't they look amazing? The are still only small and if I leave them one more day they may get bigger. What do you think?


Day 8.  I couldn't wait any longer, here they are, in my salad!  They tasted amazingly fresh, crunchy and very, very healthy. The broccoli seeds were so amazingly crispy and tasty and the radishes had a nice bite. See how easy it is?


Friday 18 April 2014

Food and Painting

My painting journey continues with the experimentation of 'Colour Field' type paintings. This style of painting typically describes often large-scale canvases dominated by flat expanses of colour and having a minimum of surface detail. I have started with three small canvases to try out a variety of techniques. These are painted with acrylics on canvas with oil glazes to bring out the colours.


I haven't yet committed to a large canvas but I'm working on some small drawings to see where they take me. If anything turns out OK I will post a photo. I am still very reticent about sharing these paintings, so I would really appreciate some feedback from you because that is the best way to learn.

The paintings are on good quality 25 x 25 cms canvas and they are all for sale. Send me an email or leave me a comment if you are interested.

I have some photographs of the plums I bought to make jam and on my next canvas I would like to try and capture the silver grey blooms on this beautiful fruit. 

My favourite things to paint recently have been flowers and fruit and I am trying to find enough free time to work on one of these large canvases every few months. I'm not very disciplined and many things distract me..........
Apart from the plums, I have been eyeing up some nice quinces with their knobbly shapes creating interesting contours and shadows. 
Speaking of colour, one of the most colourful dishes you can prepare comes from Israel. Shatshouka was introduced into Israel from Turkey via the Middle East. In many countries in the Middle East you will find variations of this dish; Turkey, Iran and parts of Africa but I believe that this is typically Israeli. 

This super recipe gets its colour and piquancy from ripe tomatoes and peppers and is an excellent dish to serve at any time of day. I must admit that I have doctored it a little. If I serve it for lunch or dinner I add eggplant because I like the flavours together, but if I want to serve it as part of a breakfast menu I leave them out. Believe me, the eggplant somehow enhances the flavours and if you leave them in, you will understand why!

Shakshouka
Ingredients


I tbsp olive oil
1 small brown onion diced
1 clove garlic minced
1 red or green capsicum (pepper) finely diced
4 cups of chopped ripe tomatoes or 2 tins of tomatoes
2 cups chopped eggplant (Aubergine) (Optional)
2 tbls tomato puree
1 tsp chilli powder or more to taste (depending on how hot your chilli powder is)
1 tsp sweet paprika
Pinch cayenne pepper
Salt and pepper
pinch sugar
2 tbls chopped parsley
4 - 6 eggs

  1. You will need a fairly big skillet or frypan for this recipe.
  2. Heat olive oil in pan and add onion, cook for a few minutes until it becomes transparent and add garlic, eggplant and pepper and cook for 5 - 10 minutes until it begins to soften. 
  3. Now is the time to add spices; chilli powder, paprika, and tomato paste, salt, pepper and the tomatoes. Cook this on your cooktop for about 20 minutes. Add a sprinkling of cayenne pepper - be careful it is very hot . Add a pinch of sugar and correct the seasoning at this stage.
  4. Depending on the number of eggs you want to use, make depressions in the tomato mixture and carefully crack eggs one at a time into the depressions, making sure they are well spaced. The eggs will cook in the mixture. Cover the pan with a lid and allow 10 - 15 minutes for the eggs to cook. Keep checking that the sauce does not reduce too much as it will burn.
  5. Once cooked garnish with parsley and enjoy. Serve with crusty bread for breakfast or a light salad for lunch or dinner.


Friday 11 April 2014

Composting

It's a white bucket with a red lid!  The latest addition to my kitchen. 

Do you compost? I have composted for a very long time. Sometimes I do it well and other times I have to admit that my compost heap suffers. In the long run that means my garden doesn't get the compost it should and the poor vegetables have to struggle.


I did have a Bokashi Bucket and while it was good, I found the addition of the composting accelerator (Bokashi mix) became quite expensive. (Maybe we used too much) When we moved house and everything went into storage for 4 months, the bucket went to friends. It has taken us a time to settle into our new place, meaning I have only just got around to replacing the bucket. But this time I have bought an Urban Composter. Thanks to one of my local shops, 'Waste Not Want Not". They have a brilliant supply of everything imaginable to help you save money and take care of the environment.


Rather than using a Bokashi mix, the accelerator comes in liquid form and you give it about 4 bursts of spray when you add scraps to it. I think you can use the Bokashi mix but I thought I would try the spray first to see how it compares price wise as well as efficiency. I have just filled up the first bucket, although I should really have cut up the scraps a bit finer to aid in their decomposition and rather than put it into my compost bin I am going to dig a hole in my woodland garden and bury it. This is what the full bucket looks like - and there's no smell! 


The other bonus is that you can turn on that tap at the bottom of the bucket and get out this luscious dark brown liquid that you can use as a fertiliser! Wicked!


One of the biggest problems we face in our garden is the soil, or lack of it. Basically we have a lot of rock and shale and very little soil. Although I have brought in tons, and I mean tons of soil and compost, there are still areas of the garden that are badly in need of some help.

It feels good knowing that the bits of food I don't use in my cooking are being put back into the garden and not being wasted.


If you have any composting tips, can you please, please let me know by leaving a comment. I might have been composting for a while but I am no expert! OK time to dig that hole!


Friday 4 April 2014

Biscuits at War


Australia celebrates Anzac Day every April 25th. It is one of the most significant occasions in Australian history. It marks the anniversary of the first major military actions fought by Australian and New Zealand forces during WW1. 

As this is a public holiday in Australia, services to honour the men and woman who fought in this war and subsequent wars, are held around the country. There are dawn services in every capital city and many smaller towns and often parades are held with many veterans, sons and grandsons of veterans who march in the parade . 


Photo curtesy of State Library of South Australia
As this year marks the 100th anniversary of the beginning of the first world war services will be greater in number and more significant. Many community projects are emerging and new plaques being installed to mark this occasion. 

Commemorative services will also be held in other countries.Turkey, Belgium and France, at the Australian War Memorial in Villers-Bretonneux and Bullecourt.


Family photo of Grandfather Alfred George with son George Giles who died on 17th April 1917
aged 20 years. He is buried at Brandhoek Memorial Cemetery, Ypres, Belgium.

In South Australia, the State Library is producing an online resource from original documents donated by the Red Cross Information Bureau. The Bureau operated from 1915 - 1919 and was a line of enquiry for next of kin of South Australian soldiers missing in combat. The link above will provide you with an insight into the project which is soon to be released.

Now how is this connected to food? Lets talk Anzac Biscuits. 
The Anzac Biscuit was given to soldiers during WW1 as a substitute for bread and was part of the soldiers diet. The soldiers did not call these biscuits because they were so hard and they were given the unfortunate name of 'Anzac Tile'. But because of their sweetness they were a welcome addition to their rations.   

There is some contention as to whether Australia or New Zealand actually invented this biscuit because they both claim it was their idea.

Many variations of this recipe can be found, some of them are hard and crunchy biscuits and others are soft and chewy, but they all contain oats, golden syrup, coconut and butter.  My personal preference is for the crunchy ones but they are so tasty that I can honestly eat any of them. This recipe came originally from the Country Women's Association and it has been in my recipe file for the last ten or so years.

I am giving you the recipe early so that you can make a batch before the day arrives. Then you can sit and watch the marches on TV, watch online video content from other countries or just have a few biscuits over a cup of tea with your mates. Any way you choose to spend the day, it should definitely involve a plate of Anzac Biscuits.


Anzac Biscuits

Ingredients

1/2 cup rolled oats
1/2 cup plain flour
1/2 cup of desiccated coconut
1/2 cup caster sugar
90g unsalted butter
1 tbls golden syrup
1 tbls  water
1/2 tsp bicarbonate of soda

  • Pre heat oven to 160C, moderately slow. Line a baking tray with baking paper. 
  • Combine oats, flour, sugar, coconut in a large bowl.
  • In a small saucepan, on a low heat,  combine butter and golden syrup, stirring until butter has melted.
  • Stir bicarbonate of soda in water in a small jug and then add to the butter mixture. Pour all of this into the dry ingredients and mix well.
  • Roll level teaspoons of mixture into balls. Don't flatten the balls but place 4 cms apart on the lined tray and bake for about 8- 10 minutes or until golden brown. 
  • Leave on tray for 5 minutes to harden then transfer biscuits to wire trays to cool before storing in an air tight container.
I could say these will keep in an air tight container for a couple of weeks, but I am joking because I doubt they would last 10 minutes.